
Group riding with BNECC
Last updated 09 Jul 26
Contents
Information for all riders
1. Safety is everyone's responsibility
3. Communication is the key to safety
4. Navigating lights and other road users
5. Understand your position in the group
8. Flat tyres and mechanical issues
Information for ride leaders
Information for all riders
BNECC is an open club and welcomes new riders. In the interests of providing a safe riding environment for all, before joining a group ride you're required to carefully read the following information, which is important to keep us all working from the same page. Existing riders are also encouraged to re-read this information from time to time.
1. Safety is everyone's responsibility
In order to ride safely in a group, each rider must be aware of a number of important factors: appropriate riding experience, fitness, a mechanically sound bike, alertness, consistent riding style, and excellent communication through clear and universally understood signals.
An underestimation of the importance of any of these factors can lead to a breakdown in the group's discipline, which will have disastrous effects.
Please note: it's important that all riding groups have slight variations on signals, calls, formations, and etiquette. Each member should read the following document to understand the basic riding etiquette rules that the club will always follow.
Erratic riding with breakaway groups pressuring the back riders can lead to rider fatigue and tired, sloppy riding technique, putting the group at risk of an accident. Regardless of how experienced or fit you are as a cyclist, and how well you communicate calls and signals, safe group riding relies on a highly responsible team effort.
2. Formation and position
2.1 2×2 formation
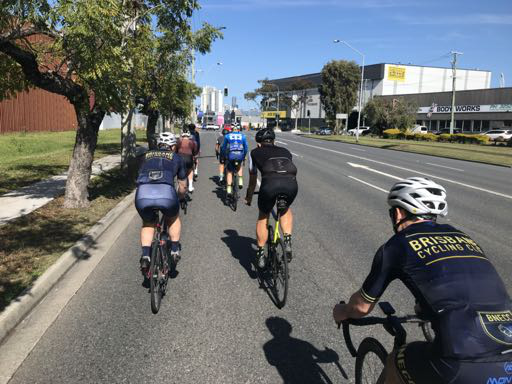
2×2 formation is standard for group rides. Riders are said to be "sitting on the wheel."

Figure 1: 2×2 formation – ride safely behind and to the side of the rider in front
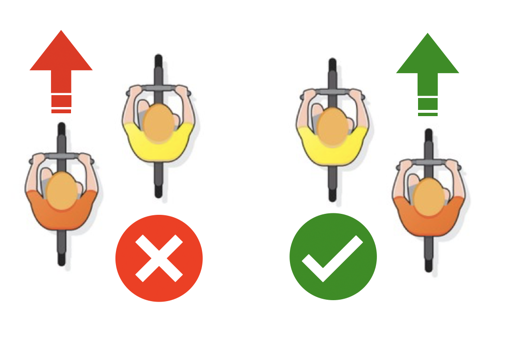
When riding in 2×2 formation, the goal is to ride evenly with your paired rider beside you. Don't ride with your front wheel slightly in front of theirs, especially when you're the pair on the front.
Focus on the person in front of you, not on their wheel. By focusing on the person, you'll get a better awareness of what's happening in the group.
Never sit directly on the wheel of the rider in front. Positioning yourself slightly off to one side gives you better vision down the line and more time to react to hazards.
Follow at a safe distance and don't overlap wheels: keep a distance of approximately 0.5–1 metre behind, and slightly off to the side of the wheel of the rider in front. If you find yourself overlapping, move to a safe distance to the side of their wheel until you can safely return to following their wheel.
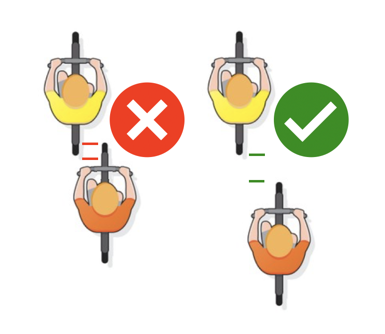
Beware of rollback. When getting out of the saddle to climb, be aware of your bike jumping backward toward the rider behind you. Signal that you're about to climb with a flick of both elbows. When following, leave room and ride slightly to the side of the bike in front to allow for rollback (about a foot or so) if the rider gets out of their saddle.
Keep pedalling and avoid freewheeling if you're on or near the front of the pack, including when drinking or eating, as coasting can cause a ripple effect through the pack.
Only pass on the right side of other riders. Ensure there's sufficient room in front of the rider you're overtaking for you to re-enter the group without causing sudden braking. Never pass on the left, as this causes accidents. If riding up beside the rider in front, let them know with "on your right!" and brake gently to find your way safely back to sitting on their wheel.
2.2 Road position
Don't ride too close to the gutter, drains, grates, or rough edges, as other riders are relying on you for a safe line to follow.
If you do find yourself off the road on rough ground, slow down, keep pedalling for balance, and stay on the rough ground until there's a safe, low-height lip to return to the road.
2.3 Crossing train tracks
Ride over tracks at a good angle, ideally perpendicular to the tracks, to avoid your wheel getting caught. Call "tracks!"
3. Communication is the key to safety
3.1 Know your calls and signals
All riders are responsible for the safety of the group by relaying messages through the group. Use hand signals only if it's safe to do so; otherwise keep both hands on the bars at all times. Always use loud, clear calls as below (those in the middle of the group must also repeat and relay all messages clearly). If you hear it, repeat it.
3.1.1 Calls and signals to send back through the group
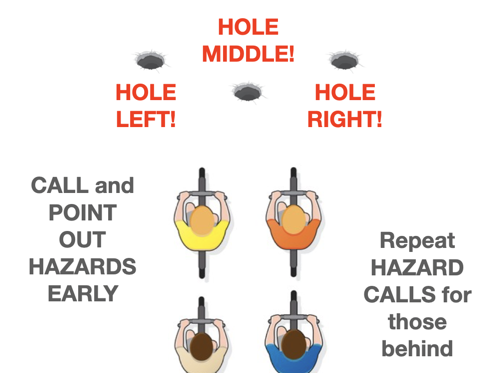
"Hole left!" – hole/pit to the left of the left column (and point to the hazard)
"Hole middle!" – hole/pit between the columns (and point to the hazard)
"Hole right!" – hole/pit to the right of the right column (and point to the hazard)
"Clear!" – the way/intersection is clear to continue
"Single!" – arrange into single file
"Rider up!" – there is a rider ahead (and signal behind your back)
"Walker up!" – there is a walker ahead (and signal behind your back)
"Car up!" – there is a car ahead coming toward you, or stationary (and signal behind your back for riders to move away from the hazard)
"Lights!" – lights ahead are changing to amber/red
"Rolling!" – you are rolling through a changing set of lights
"Slowing!" – you are slowing
"Stopping!" – you are stopping / those behind also need to stop to avoid hitting you
"Door!" – when passing a line of stationary vehicles, where a door has been or is about to be opened (and indicate behind your back for riders to move away from the hazard)
"Glass!", "Crack!", "Rocks!", "Stick!", "Branches!", "Gravel!" – etc. (and point to the hazard)
"Train tracks!" – there are train tracks ahead (and give the tracks signal behind your back)
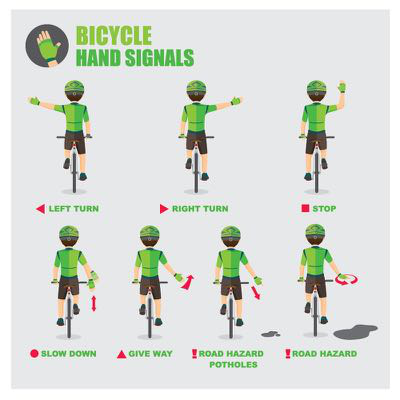
Figure 5: Bicycle hand signals (Source: Bicycle NSW)
3.1.2 Calls and signals to send forward through the group
It's essential that calls are passed forward to the front riders, as they're guiding the group and setting the pace but can't look back to see what's going on. They need to know what's happening at the rear of the group and rely on calls being relayed loudly and clearly forward.
"Car/s back!" – if a car/s arrives at the back of the group
"Car/s passing!" – if a car/s initiates a pass
"Rider/s passing!" – if a rider or group of riders has caught the group and initiated a pass (usually the front of passing groups will communicate with the rear of your group as they initiate the pass)
"Split!" – when the group is split for any reason (usually stop lights, hill climbs, or a pace that has dropped some riders)
"Flat!" or "Mechanical!" – a rider has a flat tyre or mechanical issue
"Sit up!" or "Soft pedal!" – lets riders know to ease off the pace (sitting up is also a good visible sign to those behind the split that the front is waiting)
"All on!" – the split group has rejoined the front of the group and pace can resume to what it was
3.1.3 Calls across – to riders beside you during rolling turns
"Yep!" – when you're on the front of the left column, this brief call lets the rider in the right column who's rolling through know that their rear wheel has passed your front wheel, and that it's safe for them to move in front of you into the left column.
"Last wheel!" – at the rear of the group, when you move from the left column to the faster right column, this call lets the rider who was in front of you know that they are now the last wheel, so they can prepare to accelerate and keep the group rolling safely and smoothly.
4. Navigating lights and other road users
4.1 Traffic lights and intersections
4.1.1 Lights red, or turning amber in the distance
Call "lights!" when lights are either red, or changing to amber/red in the distance, to make the group aware of possible slowing or stopping.
4.1.2 Lights turning amber immediately ahead
Obey road rules where it's safe to do so:
Call "stopping!" if it's safe to stop. Those at the front of the ride need to allow for the fact that the group behind them has a delayed reaction time. This means the group will often roll through amber lights, even though the front few could have stopped, because those behind may not stop in time, causing an accident.
Call "rolling!" if those at the front of the group determine that the group can safely make it through.
4.1.3 When the group is split
If the group is long and splits at an intersection or red lights, someone in the middle of the group should call "stopping!" Those behind should immediately repeat the call.
Those in front of the split need to immediately call "split!", which should be relayed to the front. They can then sit up and soft pedal until the split riders catch up.
Once the group has rejoined, the call "all on!" advises the front riders that they can resume normal pace. If front riders ask "are all on?" it's important that this is relayed back to confirm.
4.2 Navigating other road traffic
Although cyclists have rights on the road, motorists are often distracted and can struggle to accurately estimate relative speed and distance, which heightens risk to all. Erratic or inconsistent cycling puts additional pressure on drivers and risks the safety of the group. Ensure that all your movements are clear, noticeable, and predictable to everyone around you.
When traffic is slow, don't ride through it to move past vehicles unless there's a clearly marked bicycle lane.
When traffic is stopped in front of the group, stop behind the last stationary vehicle, as you would in a car. A large group behaves like a vehicle on the road and needs to act like one.
5. Understand your position in the group
5.1 Riding at the front of the group
The riders at the front play an important role in providing a smooth ride for the group. They set the pace, call out road obstacles, and warn the group of traffic changes. Leading the group is not the time for a social chat. It's important to properly identify what's genuinely hazardous; a hazard need not be called if it's too far away or too minor to matter. Making too many irrelevant hazard calls can lead the group to become unresponsive to calls, so that when a call really matters, it gets ignored. Lead riders must constantly scan the road ahead and make safety calls in advance (hazards, single file, etc.).
5.1.1 Pace setting
Keep pedalling over the top of a hill; the riders behind need to maintain speed to get up the hill.
Lead riders should always pedal while going downhill to maintain the group pace. Because climbs often stretch the group, those on the front should ease off gently over the top of a crest.
When riding on the front, don't attack or accelerate away from the group unless there's a planned hit-out section. If you must ride off the front, let a ride leader know beforehand.
5.1.2 Rotating the lead riders – 2×2 cruising pace
Lead riders shouldn't stay on the front too long (no more than 5 minutes).
If you don't feel strong enough to take a turn when it's your turn on the front, take it anyway, but tell the rider on your left that you're tired and will roll over. Ask the new front rider on your right to also roll over so you're no longer on the front. Don't suddenly pull off the line to drop back when it's your turn, as this only leaves a gap and creates risk.
5.1.3 Passing other bunches of riders
On any ride there's a strong chance your group will need to pass other groups. To pass safely, please observe the following etiquette. Those on the front of your group need to determine whether it's safe for the whole group to begin passing another group. If unsafe, call "slowing!" and wait until it's safe. If necessary, arrange single file first by calling "single file!" and signalling to those behind.
Making the pass
Announce to those at the rear of the other group that you're passing by sounding your bell and calling "passing right!"
Pull out to the right to allow at least a 1 metre sideways gap between their riders and yours.
Once you've passed the front of the other group, stay to the right until the rear riders in your group have safely passed the front of the other group by about 10 metres, before resuming your original line on the left side of the road. Clear communication and safe riding distances keep things safe for all, and are always appreciated by other riders.
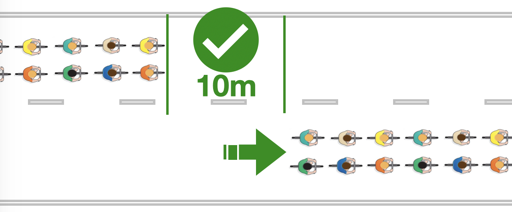
Figure 8: When passing other groups, leave plenty of room for the rear of your group to pass the other group before moving back to the left
5.2 Riding at the rear of the group
The riders at the rear of the group also carry a huge responsibility for the safety of the group, particularly the rider on the outside right. This person must:
5.2.1 Changing lanes
When the group needs to change lanes, the front riders must hand signal. The rear rider must call "wait!" if it's unsafe to move across, and take the lane when safe. The ride leader at the back will anticipate lane changes in advance, take the lane when safe to do so, and call "take the lane!" to those in front. This also signals to cars behind that the group is changing lanes, preventing car–cyclist accidents. Those at the front should be able to look behind and see that the rear ride leader and those at the back of the group have taken the lane, confirming it's safe for them to do so too.
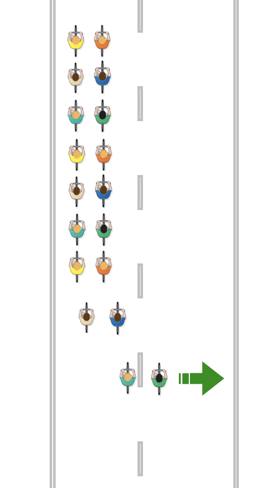
Figure 6: The rear of the group checks and prepares for lane changes, calling to those in front, "Take the lane!"
Before every check behind you, which requires taking your eyes off the rider in front, allow extra room to the wheel in front to account for the longer reaction time.
5.3 2×2 single rolling turns – for headwinds and faster pace
Rolling turns help the group work together, enhance overall speed, and share the load of riding on the front. This is usually employed in headwinds, or when the goal is higher speed (e.g. Full Gas Fridays).
5.3.1 Rolling turns in 2×2 formation – the rules
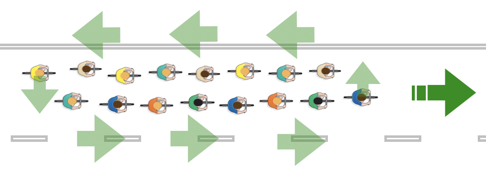
Figure 7: Rolling turns – the group rotates in an anti-clockwise direction while moving forward. The right column moves faster than the left column.
Riders on the outside of the group travel faster than those on the left; the group is "rolling" turns.
The lead rider in the right column rolls over to take the front position of the left column, keeping eyes ahead at all times.
The safe moment to roll over from right to left is when your rear wheel has just passed the front rider in the left column. That rider calling "yep!" lets you know your rear wheel has passed their front tyre and it's safe to move in front of them.
The rider who has just moved to the left must keep pedalling but can ease off slightly so the group pace remains constant.
All riders, especially those near the front of the pack, should continue pedalling without freewheeling.
The last rider in the right-side column must tell the last rider in the left-side column that they are now the "last wheel," so they know they're next to move across the back of the outside column.
If a rider isn't taking a turn on the right column at the rear of the group, other riders can call for them to take a turn if possible. If that's not possible, the rider should drop back a little and communicate clearly with the riders in front with "you go!" This is known as wheel sucking, and while permissible, it does forgo bragging rights after the ride. See rider etiquette for more on wheel sucking.
5.3.2 Single file rolling turns
When riding in single file, lead riders can indicate for the next rider to come to the front with a flick of the right elbow. If the rider behind can't come forward, they should communicate so others behind can come forward instead.
5.3.3 Bike paths
Take special care on bike paths and ride to the conditions, watching for and communicating with other riders in both directions. Clear calls are especially helpful, and all riders in the group should watch ahead to avoid collisions. Single file is often appropriate; front riders shouldn't be afraid to call for this. When passing, or in technical sections, observe all guidance above.
6. Struggling riders
Usually, some support from other riders in the group is enough to provide additional shelter and support for struggling riders.
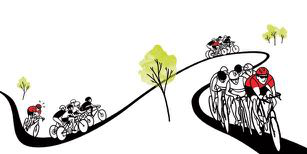
If the struggle is such that a new plan is needed, group leaders will make a plan to get struggling riders home. This may mean dropping the pace for the whole group slightly, or, if the struggle is significant, one ride leader can form a new group with the struggling riders while the other ride leader continues with the rest of the group.
7. Strong riders
Remember that in a group ride you're not riding for yourself, but for the group. If you're feeling strong, take turns at the front, providing additional shelter and support for struggling riders. It will be appreciated!
At regroup points, ensure there's at least some break time for struggling riders to quickly refuel, rest, and hydrate. An extra minute or two for a struggling rider to recover can be the difference between them being dropped again straight away and making the ride longer for everyone.
If you have extra energy to spare, make the most of the planned hit-out sections.
8. Flat tyres and mechanical issues
If you or someone near you has a flat or mechanical issue, call "flat!" or "mechanical!" This signals others to stop when it's safe to do so. It's important that some riders stop with the person to help them get back on the road quickly. If the issue is complicated, ride leaders will determine the course of action for the group.
Typically the group will wait until the issue is fixed and then resume the ride:
In some cases, strong riders will tell the ride leader they're happy for the group to continue, and they'll work together to catch up (often when the issue is simple or only a short time from being resolved).
In some cases the issue is significant, and a decision may be made to abandon the group ride and arrange a rideshare home. In these cases, the person with the issue may need other riders to wait with them until they're safely collected, before continuing home without the group. Ride leaders should be part of any such decision.
9. Wet weather
Clear, loud, repeated communication becomes even more important in the wet – make sure it happens. Communicate slippery spots and difficult corners. The group should corner carefully and look after each other. Teamwork trumps your need for Strava segments – remember this!
Increase the gap between cyclists.
Allow for longer stopping times, as braking surfaces will be wet.
Accelerate more slowly to avoid skidding.
Slow down, especially when cornering.
Be wary of slippery materials – road paint, metal grates, tracks, etc.
Use lights to increase your visibility on the road.
Reduce tyre pressure to allow more of the tyre to grip the road (around 20 psi less than usual).
10. Other safety reminders
Be consistent and predictable.
Don't use mobile phones or in-ear headphones while riding.
Use lights whenever possible, not just in low light. Keep front lights on a constant, bright setting, and ensure rear lights aren't flashing or too bright.
Check all attachments to your bike are secure.
Always use a proper cycling water bottle; other bottles can fall out of the cage and become a hazard.
Get off the road when stopped.
If you accidentally bump shoulders or handlebars with another rider, don't panic – stay relaxed and lean away from each other.
Ride within your ability; don't overextend yourself.
Ride with the club as much as possible to learn how the group feels on the road.
Dress according to the weather.
11. Rider etiquette
People appreciate clear, loud, repeated communication. Be part of building a strong and safe culture within BNECC.
Be on time; don't be late to ride starts. If you are late, it's on you to either catch the group or make another plan.
Take your turn on the front when it's your turn (unless you cannot).
Ride smoothly for those behind, and avoid swerving or surging.
If you need to clear your nose, wait until you can move to the side to do so.
If others give you tubes, gas, or similar, buy them coffee — or if they aren't there, pay it forward by helping someone else next time.
Keep your bike well maintained and with good tyres; others are depending on you.
Please wear your BNECC kit on Fridays, Sundays, and when racing.
When wearing BNECC kit, remember you're an ambassador for the club – help keep our good name in the community by being safe and courteous to all other road and path users.
If you can't take your turn on the front and have no option but to sit on the back of the group (wheel sucking), you forgo bragging rights, and should acknowledge the group in your Strava post. Wheel-suckers shouldn't post better times than those who did the work.
Ask permission if you use someone else's photo, and credit the photographer in your post.
12. Accidents and injuries
12.1 Minor accidents and injuries
A minor accident or injury is one where the injured rider can move themselves and their bike to safety, no other road users are involved, and there's no need for an ambulance or police report.
In case of a minor accident, other riders should work together to:
Guide other road users to slow or stop to make the scene safe, securing the accident zone and protecting any injured riders until they can make their way to safety. Assist if needed.
Assess the extent of injuries and provide assistance. Most minor injuries cause more inconvenience and discomfort than anything else.
Have ride leaders collaborate to determine how and when the group continues.
12.2 Significant accidents and injuries
A significant accident or injury is one where the injured rider cannot, or should not, move themselves or their bike to safety, other road users may be involved, and an ambulance or police may be necessary.
In case of a significant accident, other riders should work together to:
Guide other road users to slow or stop to make the scene safe, securing the accident zone and protecting injured riders from further harm.
Assess the extent of injuries, starting with the most injured. Do not move any rider with a suspected head, neck, or spinal injury.
If there's any possibility of injury (spinal injuries are often not immediately evident, so err on the side of caution), call 000 immediately and arrange an ambulance. You'll need to give an accurate description of your location, the number of injured people, and a description of the observable injuries. Never be afraid to call an ambulance: in Queensland, ambulance services are provided free by the Qld Government, regardless of which state you're in at the time. Once the injured person has been moved from the scene, their case will be de-escalated by ambulance staff.
Ask if anyone in the group has medical training and invite them to assist. The most qualified person present should lead the delivery of first aid. In the absence of medically trained professionals, BNECC riders should be prepared to take control of the situation, regardless of advice offered by other well-intentioned bystanders. Insist, to both the injured person and other cyclists, that the injured person isn't moved until paramedics arrive. (The author of this section was moved following an accident before paramedics arrived, and later discovered a broken sternum and a fractured vertebra — both of which could have been made worse by being moved.)
Say to the injured person: "I want you to lie still and rest as much as you can. As a precaution we've called an ambulance, which will be here shortly. They'll be able to assess you and help us work out what you need."
Say to others who stop to help: "We won't be moving the injured person. Paramedics are on the way; they'll assess the situation and we'll take their advice."
If there's significant bleeding, stem the blood flow by applying pressure to the nearest point above the wound. A thumb is often the best tool for this.
Other riders should help keep the scene safe, directing road users safely around it if necessary.
If riders are available, help make the injured person as comfortable as possible until help arrives (shade from the sun, small sips of water, etc.).
Riders should keep ride leaders updated on any developments.
Once care for the injured person has been arranged, ride leaders should collaborate on the plan for the rest of the ride. This may mean most of the group continues with one ride leader, while others remain behind as witnesses to assist medical or police staff, alongside the other ride leader.
After the ride, ride leaders should email a summary of events to the club president.
Information for ride leaders
13. Before the ride
13.1 Familiarise yourself with the route
Ride leaders should be aware of the route, and ideally have ridden it before. Every route has areas where a little forewarning can help avoid accidents: spots that are straightforward for a single rider can become a pinch point for a large group, such as shared bike paths (e.g. Hornibrook Bridge) or technical traffic sections (e.g. Anne Street inbound). Discuss these as ride leaders so you can share them with the group beforehand, and remind riders during the ride.
13.2 Route changes
Any decisions affecting the group should be made collaboratively by the ride leaders. As a courtesy, update the ride planner if major changes are proposed, or if cancellation is necessary.
13.3 Questions on Team App
Ride leaders should check and respond to any comments on Team App.
13.4 Cancelling a ride
In the event of inclement weather, the decision to cancel a ride is the responsibility of the ride leaders. This is often a short SMS conversation at 4am, based on the latest weather and radar. If the ride is cancelled, add this to the ride chat (and, if possible, to the ride title) on Team App.
14. Ride briefings
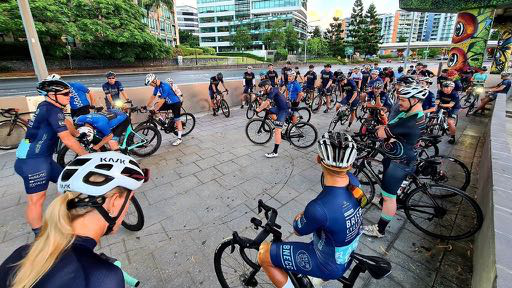
Shortly before the ride starts (4–5 minutes), gather your group together for a ride briefing. Speak clearly, in a voice that your riders can easily hear.
14.1 What to include in your ride briefing
Welcome everyone, and mention whether this is a G1, G2, or G3 ride, so people know they're in the right group.
Introduce yourselves as ride leaders.
Ask new riders to identify themselves and make them feel welcome.
Emphasise the importance of clear communication, especially around splits at lights, mechanicals, or if someone is struggling.
Mention that you're riding as a group – no drops.
Give a brief course description, including any known hazards.
Mention planned hit-outs and regroup points.
Note the coffee location.
Ask if there are any questions.
Lead out safely (be especially careful entering the route, particularly at GBB).
15. On the ride
15.1 Typical arrangement of ride leaders
It's good to have one ride leader near the front and the other at or near the back. This usually means the front ride leader circulates among the top 4–6 riders, while the rear ride leader either sits at the back or circulates within the back 4. During simple sections of the ride, ride leaders can swap positions, and will consult each other on decisions as needed.
15.1.1 Front ride leader
Typically sets and keeps the correct pace with the front riders, provides route guidance, determines safety calls when passing other groups, and keeps an eye on the rear ride leader when changing lanes, especially at key turn points, roundabouts, and lights.
15.1.2 Rear ride leader
Looks out for struggling riders, anticipates lane changes, keeps an eye on the group dynamic as a whole, and may need to guide certain riders on group awareness and safety etiquette.
15.2 Pacing the group
15.2.1 Know your target pace
You should have a good idea of the target pace for your group. If unclear, check with other ride leaders beforehand. As a benchmark, on a reasonably flat ride (e.g. the Redcliffe or Carbrook loops):
G1 averages 33–35 km/hr over 100 km
G2 averages 31–32 km/hr over 100 km
G3 averages 28–30 km/hr over 80 km
These average speeds include stopping for lights and exercising caution when starting out in the CBD. Adjust these down for hill rides, and note that pace will also vary from ride to ride depending on the strength of the riders present.
15.2.2 Strategies for struggling riders
Support from other riders in the group is often enough to provide additional shelter and support for struggling riders.
On flat sections, the rear of the group is often the best position for struggling riders.
On hilly sections, it helps struggling riders to move to the front third of the group on downhill and flat sections, tucking back into the line so they have room to drop back through the group on climbs without falling off the back. If you're a stronger rider, make room for weaker riders using this strategy when they indicate a desire to tuck in.
In technical sections followed by acceleration (e.g. moving from a tight footpath section onto a wide, flat section), it helps struggling riders to sit from the front to the middle of the group rather than toward the back. This is due to the "elastic band" effect: there's a small reaction delay between each rider, so when front riders accelerate out of a turn, the surge is much greater by the time it reaches the back of the group. Front riders should stay aware of the effect their accelerations have on the back of the group, and adjust if others are struggling with the pace.
If the struggle is such that a new plan is needed, group leaders will make a plan to get struggling riders home. This may mean dropping the pace for the whole group slightly, or, if the struggle is significant, one ride leader can form a new group with the struggling riders while the other continues with the rest of the group.
15.2.3 Strategies for very strong riders
Without realising it, very strong riders can easily settle into their favourite speeds, causing the group to work harder than planned. This introduces fatigue for some riders and increases risk for the group as a whole.
Remember that your group includes riders who signed up for what was advertised. A very hard ride can ruin someone's day and their confidence to ride under your leadership again. If some riders are pushing harder at the front, talk with them about adjusting the group speed to avoid splitting the group. If strong riders persist in riding hard on the front, or choose to join faster groups passing yours, you may need to lead your group at a steady pace and let the faster riders move off the front, so your group avoids getting tangled up with faster groups. Getting the whole group safely home is the priority – you don't want to lose people from the back of the group, especially far from home.
15.2.4 Hit-outs and self-paced sections
Every good ride benefits from some hit-outs or self-paced climbs. These give stronger riders a chance to blow off some steam and have fun, while giving slower riders a clear idea of what to expect until the regroup. For every hit-out or self-paced section, it's important to know where the planned regroup spot is.
Hit-outs are best planned for simple sections of the route, often with long, straight, smooth stretches – for example, the Redcliffe loop from Kallangur to Kippa Ring.
Self-paced sections give everyone the freedom to set their own pace on long climbs, descents, or hilly sections.
16. Planning regroup points
Planned regroup points should be advertised before the ride on Team App and shared in the ride briefing. As a ride leader, you may need to add additional regroup points, usually at the top of climbs or hilly sections, the end of hit-outs, or critical turns.
Let the group know about these when it's safe to do so; sometimes this means sharing with the group while riding, for example when the group has spread out unexpectedly.
